
Every painting contractor knows that, when used properly, airless paint sprayers can make most house painting projects go much quicker. Research conducted by the Painting and Decorating Contractors of America (PDCA), found that airless spraying can save painters between 50% and 75% of their painting time. Airless spray is at least 4 times faster than brush applications and at least 2 times faster than roller applications.
So, naturally, lots of Do-It-Yourself'ers are tempted to try their hand at making use of this equipment to save time on their own jobs. And as long as they're armed with the supplies and the know-how to do it right, they can also enjoy the benefits of this great time-saving technology.
This week's article will give you the skinny on the when, where, and how of operating an airless paint sprayer just like the professionals do. We will be focusing the content of this post on spraying the exterior of your home, as spraying inside an occupied residence is not something that a DIY'er should attempt, as the difficulty and the risks are just too many.
Supplies Needed to Apply Paint with a Sprayer
Before we get too far ahead, it is important to understand that there is a LOT of prep work involved in applying paint with a sprayer. Airless pumps create a significant amount of overspray that can travel great distances on a windy day. If you're not absolutely confident in your ability to protect all of the surfaces that are nearby your area to be painted, it is best to do your painting the old fashioned way -- with a brush and roller.
But if you're up to the challenge there are some supplies that you'll need before you get started:
- Electric airless paint sprayer (you can rent these at most equipment rental stores or your local paint store)
- Spray tip (purchase the size that is recommended by the manufacturer of the paint you're using)
- 1-1/2" or 2" masking tape (buy several rolls of high-quality regular masking tape and blue painters' tape)
- Plastic masking film (these plastic films come in a variety of sizes and most of them will stay in-place using static electricity so it's easier to tape down the edges.)
- Roll of heavy mil plastic (something heavy enough that it can be walked on -- at least 1.5 mil)
- Garter-top paint strainers
- Spare 5 gallon buckets
- Spray hood or Spray sock (keeps paint out of your hair and off of your face)
- Spray shield
- Extra paint (The percentage of material that is successfully transferred from the bucket to the wall, or transfer efficiency, is about 60% with an airless sprayer, so you could end up using as much as 40% more paint versus brush and rolling.)
- Good-quality 3" or 4" paint brush
The Anatomy Of An Airless Sprayer
An airless pump has a few basic parts that you should be familiar with before you begin.
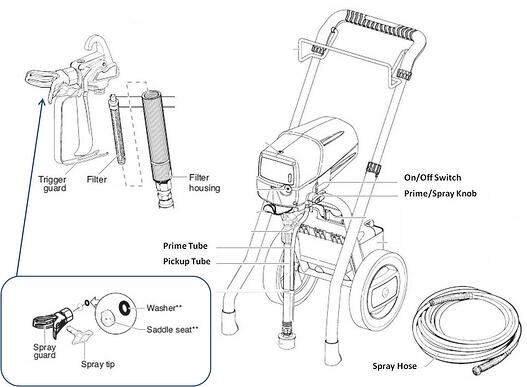
- On/off switch
- Pressure control knob - This allows you to adjust the pressure that the paint is being pushed through the pump.
- Pick-up tube - This is the large siphon tube that pulls the paint from the bucket into the machine.
- Prime tube - When the pump is in 'prime mode' this smaller flexible tube ejects paint to show you when it is primed.
- Prime/spray knob - This switches the pump between 'prime mode' and 'spray mode'.
- Spray Hose - A high-pressure hose (usually 50' in length) that carries the paint from the pump to the gun.
- Gun - Attaches to the end of the spray hose and has a trigger that allows you to control the spray.
- Guard - Screws onto the nozzle of the gun and holds the spray tip securely in place.
- Spray tip - Slides into the guard and atomizes the paint as it passes through it. Allows you to control the amount of material that can pass through the gun as well as the fan pattern size. The sizes are determined by the three numbers you see on the package (such as the commonly seen 417). The first number is half the width of the spray pattern that you'll see on the wall when you're holding the gun 1 foot from the surface. The last two numbers are the orifice size which should be selected based on the suggestion of the paint manufacturer. So, a 417 tip size would be the one you should choose if the manufacturer calls for a .017 orifice size, and you want to make an 8" wide spray pattern on your wall with each pass of your gun.
Setting Up Your House Painting Site with a Sprayer
The first thing I like to do when I get my rental pump to my home is to test the unit to make sure it's working. These pumps need to be thoroughly cleaned after every use to ensure they are functioning properly, but unfortunately it doesn't always get done by the rental shop.
- With gun detached from the hose, use an adjustable wrench to unscrew the gun's handle (which is also the filter housing). Remove the filter from inside the housing to make sure it isn't clogged. If it is clogged, you can either attempt to clean it or request a new one from the rental shop. Replace the handle and secure it with your wrench.
- Using your adjustable wrenches, make sure your spray hose is securely attached to the pump and the other end to your gun.
- Take a 5 gallon bucket and fill it up about half way with clean water so you can rinse out the sprayer to remove any left-over paint or storage solutions.
- Insert your pick-up tube into the water, plug in the machine, move the prime/spray knob to the 'prime' position (usually the lever will be pointing straight up and down), and direct the prime tube to pump the dirty water into a separate empty bucket, and turn the on/off switch to the 'on' position.
- As long as the pump is priming correctly, water will be ejected out of the prime tube and into your empty bucket. Allow the pump to continue to run in prime mode until the water runs clear out of the tube.
- Once the water is running clear, turn your prime/spray knob to the 'spray' position (usually the lever will be pointing sideways). You will see the spray hose begin to pressurize, and within a few seconds, once the hose has completely pressurized, the sprayer will stop pumping and come to a rest.
- Turn your pressure control knob counter clockwise until the pressure has been completely turned down. Pick up your gun without the spray tip inserted, point it into your dirty water bucket, and gently squeeze the trigger (watch for splashback out of your bucket). Pump water through the gun until it comes out completely clear.
- Turn on/off switch to the 'off' position and squeeze the gun trigger to relieve the pressure from the hose. Your sprayer is now clean and ready to be used for paint.
You can now move to preparing the house and surrounding areas to be sprayed.
Using your masking tape and film, protect all areas that are near the surface where you're working, including: doors, windows, shutters (remove them if you can), and trim. Use your heavy mil plastic to protect porches, decks, railing, etc. so that it doesn't get torn during the process.
Your sprayer and spray hose have been primed and filled with water, but now we need to remove the water and fill them with paint. To do this:
- Dump any remaining clean water out of your bucket. Insert a 5 gallon garter-top paint strainer into the bucket and pour 2-3 gallons of paint from their cans into the bucket -- using the strainer to sift out any undesirable junk from the paint.
- Insert the pick-up tube into the strained paint. Move the prime/spray knob back to the 'prime' position, direct the prime tube to pump the paint into your dirty water bucket, and turn the on/off switch back to the 'on' position.
- Assuming the machine has been serviced correctly by the rental shop and can siphon paint without any problem, your paint will be ejected out of the prime tube and into your empty bucket. If it does not, call your rental shop.
- As soon as you see paint being pumped out of the prime tube, turn your prime/spray knob to the 'spray' position. You will see the spray hose begin to pressurize again and come to a rest after a few seconds. If it does not, call your rental shop.
- Pick up your gun without the spray tip inserted, point it into your dirty water bucket, and gently squeeze the trigger (watch for splashback out of your bucket). Pump paint through the gun until all of the water that was left in the spray hose has been pushed out and you see pure paint coming out of the gun.
- Your gun should have a safety feature called a 'trigger lock' which prevents the trigger from being pulled. Set your trigger lock and remove the guard. Insert the washer and seat saddle (these come with the new spray tip) into the guard per the instructions on the tip's package. Insert your spray tip into the guard with the arrow pointing forward, and tighten down the guard onto the gun by hand. It should be hand-tight only, and not tightened with any tools. The 'wings' of the guard should be oriented on the gun as shown in the pictures above and below so you can spray in horizontal passes rather than vertical ones.
- Using a piece of cardboard as your practice wall, you're going to turn off the trigger lock, hold your gun approximately 1 foot from the surface, and gently squeeze the trigger while moving your arm slowly and steadily from one side to the other to make one pass with your gun. Look closely at your spray pattern to see if there are any lines at the top and bottom (also called "fingers" or "tails"). If there are, you need to turn your pressure control knob clockwise 1/4 turn. Make another pass and check your pattern again. Continue to adjust your pressure upward until the lines disappear and you have a solid fan pattern.
- Engage your trigger lock once you're finished. Always keep it locked when you're not using the gun to keep from accidentally painting yourself or something else you don't want to paint.
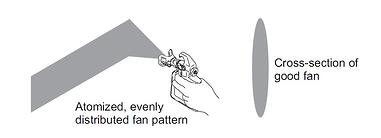
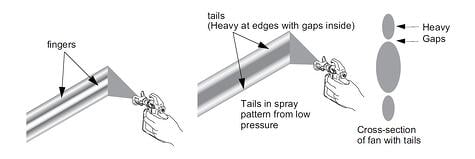
Once you've achieved a solid fan pattern, your pressure has been adjusted correctly and you're ready to spray. The goal is to use as little pressure as possible while maintaining a solid fan pattern so you don't end up using an excessive amount of paint. If you find that you have to significantly adjust your pressure upward to remove the lines, or that the lines are still there no matter how much you adjust the pressure, call your rental shop to inform them, as the packings inside the fluid section of the pump may be worn and need to be scheduled for periodic replacement.
Ready To Spray
*Before you spray anything, make sure that you only point the gun at the surface of your home where you intend to paint. NEVER point it at a person or put your hand in front of the guard, as you can actually inject paint into the skin, which will result in a trip to the emergency room.*
Starting at the top of the siding on your house, spray in slow, steady passes, keeping your wrist locked and the gun perpendicular to the house. Don't try to reach too far on either side of your body or tilt your wrist to either side, as this will cause an uneven thickness to be applied in those areas.
Practice starting your arm movement on each pass a couple of inches before you pull the trigger, and release the trigger a couple of inches before you stop moving your arm on the pass. This takes some practice but will prevent heavy paint build-up at the beginning and end of each pass. Overlap each pass by about 50% with the previous pass to ensure no thin spots between passes.
On lap siding, be sure to coat the bottom of each of your siding clapboards by ever-so-slightly angling your gun upward during your passes.
Use your spray shield to protect adjoining areas that are difficult to mask off, such as your foundation, soffits, fascia, and gutters.
Periodically, it is common for your gun to become clogged. If this happens just engage your trigger lock, spin your tip around so that the arrow is facing toward the back of the gun, point the gun into your dirty water bucket, disengage the trigger lock and squeeze the trigger very briefly. This should clear the clog. Now, just lock the trigger again, spin the tip so that the arrow is facing front, and resume your work.
For anyone new to airless spray painting, it's always a good idea to apply paint to a reasonably sized section of the siding, then set your gun down and use your paint brush to smooth out the finish in that section (this is called back-brushing). It will help even-out heavy and thin spots, as well as give your siding a brush-stroke texture that's much easier to touch-up later. If you want to speed the process up, have a helper follow behind you back-brushing as your spray.
When you finish with the sprayer, spray a little extra paint into a clean container that you can seal with a lid. You can use this paint for touch-up purposes, and it will blend-in better than paint that has not been atomized through your sprayer.
Clean Up
When it's time to clean-up, follow the same instructions as you did when you first tested the pump with water. Run water through the pump until it comes out clean.
You don't want to store a pump for any lengthy period of time with plain water in it. So speak to your rental company as to whether they expect you to run a 'pump saver' additive through it or if they take care of it when you return the unit.
Check out our video below on setup and cleanup of an airless sprayer:
A Word About Overspray
There are certain times and situations where spraying is not advisable. As I mentioned earlier, about 40% of the paint that comes out of the gun doesn't end up on the house. The rest ends up as overspray or atomized droplets that hit the siding and bounce off (known as bounce-back). That overspray can travel tremendous distances through the air, especially on a breezy day and/or if you're painting at a higher elevation (such as a second story on your home). Overspray has even been known to travel hundreds of yards and land on nearby cars or homes.
If you have neighbors that are close, cars traveling or parked in the area, or a windy day -- don't chance it! If you're unsure, it is always best to call in a professional painting company that has a lot of experience working with spray equipment.
If you're located in the Greater Pittsburgh or Western Pennsylvania areas and would like some assistance with your house painting project please give us a call at 724-898-2446, visit our 'Contact Us' page, or click on the button below to have us contact you.

Diagrams by ImageWorks Painting's spray equipment manufacturers -- Graco Inc. & Wagner Spray Tech

Contact the Pros
Ready to get started with your next painting project but unsure if it is in your budget? Reach out to the expert painting team at ImageWorks Painting to schedule a free consultation today. Give us a call at 724-898-2446, or request a visit online.