


For a professional painter, the devil's in the details. And few details are more important when it comes to a great looking paint job than clean, crisp, lines in your finish.
Caulking serves some very important functions for a painter -- from sealing out moisture and drafts from a building, to concealing cracks and gaps in exterior siding or interior walls prior to painting. But a bad caulking job will not only bring down the overall quality of the finished project it can also defeat the point of what you've spent so much time trying to accomplish in the first place.
Believe it or not, caulking is a legitimate trade in the construction industry. There are many companies who's sole occupation is caulking, sealing, and waterproofing structures -- usually in commercial construction applications. But the point is that there is a skill, even an art to applying and finishing caulking, and if you want your next painting project to turn out great it warrants taking the time to learn how the pro's do it.
Types Of Caulking
Before we get into the "how" of this article, let's first discuss the "why" and the selecting of the right kinds of caulking material for your job.
There are two broad categories when it comes to caulking: Adhesives and Sealants
Adhesives are just what you would expect them to be -- they are used to bond one type of surface to another. That concept is pretty self-explanatory, and although there are many different types of adhesives that would probably deserve an explanation piece devoted to them, for the purpose of this post we'll be focusing exclusively on sealants.
The purpose of a sealant is to seal cracks, gaps, and joints between materials to keep out moisture and drafts -- not to mention to give the paint job a seamless final appearance. Sealants also come in many different varieties depending upon the type of project you're doing.
- Latex Caulk or Acrylic Latex Caulk (Also known as "painter's caulk") - This is probably the most common type of caulking that you see used by everyone. It's inexpensive, paintable, readily available almost anywhere, and it's soap-and-water-cleanup makes it very easy to work with. It will most often have a 20 or 25 year warranty on the label (which I'm pretty sure is an attempt at humor on the part of the manufacturer).
The problem with it is that it is vastly over-used and is honestly not a high quality sealant. The difference between an $.89 tube of caulk and a $5.00 tube of caulk is not noticeable when you're applying it. But it's definitely something you'll notice later as the caulking cures and begins to age.
Inexpensive caulks will tend to shrink more and sometimes pull away from the joint as they dry. But even if they pass the initial shrink test most of them lose their flexibility as they age and will begin to crack and pull away from the joint over time. Latex caulks are also typically not a good choice for exterior application because they cannot stand-up to the demands that are put on them when materials (siding, trim, windows, doors) expand and contract with the change in temperature and weather. - Acrylic Latex Caulk *Plus Silicone - In my opinion this is the minimum standard of sealant that should be used for interior painting project applications such as the joints where baseboards, door & window casings, and crown moldings meet the walls. However, I would still recommend steering clear of it on outdoor applications.
It has all the same benefits of regular latex/acrylic-latex caulks but the added silicone gives it more flexibility so it will last longer. The price difference between it and the standard latex/acrylic-latex is minimal but it does usually come with a longer warranty on the label -- typically a 35 year -- for whatever that's worth.
- Premium Sealants, High-Performance Sealants, Indoor/Outdoor Sealants, Window & Door Sealants, etc.- As you move up the performance ladder you'll find variations of high-performance sealants. Some of them are acrylic-latex caulks with special additives that make them more flexible, some are elastomerics, and some are polyurethanes (usually considered the top-of-the-line).
They're called by many different names, and have many different intended uses but you'll know the difference in quality by the difference in the price tags.
When you're selecting a premium sealant pay close attention to the label to ensure that it is suitable for your particular project. Look for things like waterproof, paintable, indoor/outdoor, fast-drying, horizontal or vertical use only, wider temperature application, etc., etc. -- depending on your needs.
These high-performance sealants are definitely worth the extra money if you don't want to run the risk of having to go back and re-caulk your entire project again. They remain much more flexible than their lesser-expensive counterparts, and are especially useful when sealing up joints on dissimilar surfaces that expand and contract at different rates (i.e. wood-to-brick, wood-to-metal, etc.)
The only drawback to these fine products is that in many cases they are not as easy to work with. Many of them require mineral spirits (paint thinner) or some other type of solvent to clean up, and they tend to be messier. However, in my opinion, enduring a little extra pain the first time around to save me from having to re-do my work is well worth the trouble. - 100% Silicone - This is a great product for some uses, but use GREAT CAUTION here. The most common uses for this type of product are kitchens (around sinks, backsplashes, etc.); bathrooms (around tubs, showers, sinks, toilets); exterior doors; and windows. Basically anywhere you need a waterproof, mold & mildew resistant seal.
In fact, you'll see many 100% silicone products labeled as 'kitchen & bath sealant' or 'window & door sealant'.
100% silicone is a great waterproof sealant, is ideal for resisting mold and mildew, and stays permanently flexible. The only downsides of silicone are that they usually require mineral spirits for cleanup and are absolutely NOT paintable. 100% Silicone sealants are a painter’s worst enemy. Once applied to a surface, it is a nightmare to ever fully remove it in order to be able to paint the area again. Never use this product on anything that may one day need to be painted.
How to Apply Caulking like a Professional Painter
Now that we've gone over the basic types of caulking that you'll have to choose from at the store, it's time to get ready to put them to good use.
Tools & supplies you'll need:
- Good quality caulking gun (Pay the extra money to get a caulking gun that has a dripless design so the tube won't continue to drip everytime you stop squeezing the trigger. Also consider a gun with a high thrust-ratio. That means you'll avoid having sore muscles on your trigger hand because you won't have to squeeze as hard -- especially if you have a lot of caulking to do or if you're using a thick product like a urethane sealant)
- Wet cotton rag in a small bucket
- Roll of paper towels
Step 1: Open Caulk and Load into Gun
The first thing you'll need to do is to open your tube of caulk and load it into the gun. A good quality gun should have a cutter located on the side of the gun near the trigger, which is basically just a hole that you stick the point of the tube of caulk into and squeeze the trigger to cut off the end.
Step 2: Cut the Caulking Tube
Cut the end of the tube as close to the tip as possible on a steep angle. Having a small hole will allow you better control of the flow of caulking and the angle will make it easier to direct the material where you want it to go.
If your gun has a puncture wire that swings out from the underneath side of the barrel you can use it to puncture the seal of the freshly opened tube by sticking it into the hole you just cut into your end. If your gun doesn't have a puncture wire, you can use a long nail or piece of wire such as from a metal coat hanger to do the job. Now just load the tube into the gun and you're ready to go.
Step 3: Remove Old Caulk
If you're fixing someone else's work where the old caulking is cracking or pulling out of the joint make sure you use a 5-in1 tool, razor blade knife, or a caulk removal tool to dig all of the failed caulking out of the joint because you generally cannot caulk over top of it.
Step 4: Clean the Surface
Make sure you use a tool to remove any debris you might find in any of your joints before you get started, and clean the area with a quick dry solvent like denatured alcohol (not paint thinner, kerosene, or any hydrocarbon product that leaves an oily film) or a waterbased prepaint cleaner that does not leave a film. Caulk, like paint, will not stick to a dirty surface.
If it is a large, deep gap that you are caulking, fill the gap with backer rod prior to applying caulking so you are not applying more than roughly ½” (or depth as recommended by the manufacture) of caulking. This will save you money, frustration, and make your caulking look better and last longer.
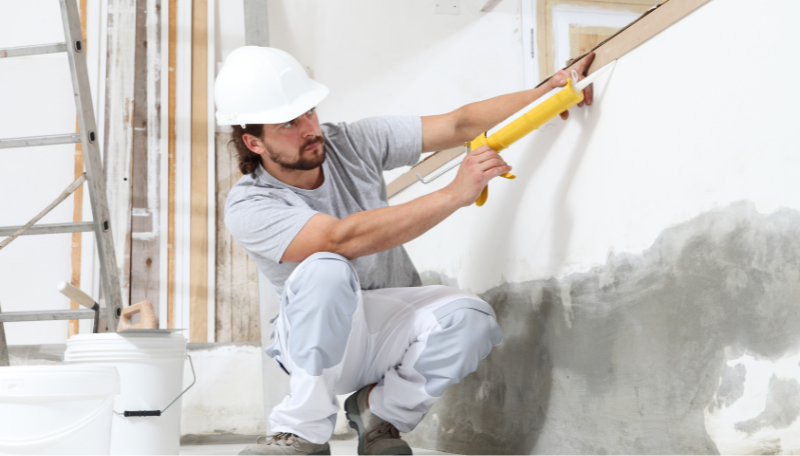
Step 5: Apply Caulk at a 45 Degree Angle
Apply the caulking -- holding the gun at a 45 degree angle and aiming the hole in your tube directly at the joint -- using even pressure as you go along. Try not to over-apply it, using only enough to completely fill the joint.
Step 6: Smooth Newly Applied Bead
Once you've finished running the length of a couple of joints, come back with your finger or a caulk finishing tool and smooth out the newly-applied bead (known as 'tooling'), applying enough pressure to push it firmly into the joint.
If you're using a soap-and-water-cleanup caulk, the damp rag will come in handy to wet your finger prior to tooling the bead to keep the caulking from sticking to you and help you to leave a smooth joint.
Step 7: Wipe Off Excess Caulk
Use the paper towels to wipe away the excess from your finger and the surface. If you end up with a large amount of excess, try applying a smaller amount in your next joint.
Fill all of your cracks and gaps, whether you're working inside or out, with the exception of the horizontal laps on your house's siding. Those should always be left alone to allow any water that gets behind your siding to drain out and away.
FAQs about Applying Caulking Properly
How do I achieve a smooth finish when applying caulk?
-
Cut the tip of the caulk tube at a 45-degree angle to the size of bead you want to make.
-
Load the tube into a caulk gun and apply even pressure on the trigger.
-
Hold the gun at a 45-degree angle and start caulking in a steady motion.
-
Use a caulk smoothing tool, such as a caulk finishing tool or a damp finger, to smooth the caulk bead before it starts to dry. Wetting your finger slightly or using a soapy solution can help prevent sticking.
-
Remove excess caulk with a damp cloth or sponge, and allow it to dry according to the manufacturer's instructions.
-
A common mistake people make is to use the smallest bead possible and/or wipe away too much excess. If your bead of caulk is too small it will crack. Maintaining sufficient thickness helps to retain flexibility.
How long should I wait before painting over freshly applied caulk?
What we do in Pittsburgh
The diverse weather patterns in Pittsburgh, including heavy snowfall and unpredictable rains, often present hurdles that can impact our services. Adverse weather conditions might result in unavoidable delays, especially during the winter months. However, we remain dedicated to keeping our commitments and timelines intact, ensuring minimal disruption to our clients' painting projects. Our product selection is intricately tailored to weather conditions. In summer, we prioritize slower drying products for better finishes, while colder weather prompts the use of fast drying options to prevent sags and expedite dry times. Spring and Fall involve specialized products for early moisture resistance. Our adaptability extends to scheduling, with midday work in milder seasons and earlier starts in summer, ensuring optimal painting conditions. This comprehensive approach guarantees both efficiency and resilience in the face of Pittsburgh's diverse weather challenges.
As for the seasonal aspects, we adapt our services to accommodate the changing climate. While interior painting can be efficiently carried out throughout the year, exterior painting is largely contingent on weather conditions. If the weather remains dry and the temperature is suitable, exterior painting can indeed be conducted year-round. We closely monitor weather forecasts and plan our outdoor projects accordingly, ensuring optimal conditions for the best possible results.
In our commitment to supporting the local community, we prioritize the use of products and materials from trusted local vendors whenever feasible. Our emphasis on regionally sourced products not only strengthens the community but also ensures that our clients receive top-quality materials that align with our standards of excellence and reliability.
When it comes to paints, we trust and utilize the renowned Sherwin-Williams brand, a popular choice among many contractors in the Pittsburgh area. While not native to the region, Sherwin Williams paints are renowned for their superior quality and durability, enabling us to deliver exceptional finishes that stand the test of time. We also utilize PPG Paints and some small manufacturer specialty materials for specific job types where ultra-premium options are not available through larger manufacturers.
Painting in Pittsburgh is a unique experience that requires an in-depth understanding of the region's specific environmental challenges. Our expertise in navigating the diverse weather conditions and adapting our techniques accordingly sets us apart. We prioritize using paints and materials that are not only aesthetically pleasing but also resilient enough to withstand the rigors of Pittsburgh's climate, ensuring that your property maintains its vibrant
If you would like a free consultation and quote for your painting project in Pittsburgh, please give us a call at 813-570-8800, visit our 'Contact Us' page, or click on the button below to have us contact you.

Photo by: Ryan Harvey / CC BY 4.0

Contact the Pros
Ready to get started with your next painting project but unsure if it is in your budget? Reach out to the expert painting team at ImageWorks Painting to schedule a free consultation today. Give us a call at 724-898-2446, or request a visit online.